Frieren: Beyond Journey’s End has captivated anime and manga fans worldwide, and the elegant elven mage protagonist has become one of the most popular cosplay choices at conventions. Whether you’re a seasoned cosplayer or attempting your first costume, this comprehensive guide will walk you through every step of creating an authentic, stunning Frieren cosplay that captures both the character’s mystical beauty and her profound character depth.
Why Frieren Is the Perfect Cosplay Choice
Frieren’s popularity in the cosplay community stems from multiple factors that make her an ideal character to portray. Her design combines simplicity with elegance – the signature silver-white hair, pointed elf ears, and layered white outfit create an instantly recognizable silhouette that works beautifully in photographs. Beyond aesthetics, Frieren’s character arc – from a cold, ancient mage learning to value human connections – resonates deeply with audiences, making her cosplay inherently meaningful.
The character’s timeless fantasy aesthetic also means the costume remains perpetually relevant. Unlike trend-dependent designs, Frieren’s mage attire transcends seasonal popularity, allowing you to wear your costume for years at multiple conventions, photoshoots, and community
Frieren: Beyond Journey’s End has captivated anime and manga fans worldwide, and the elegant elven mage protagonist has become one of the most popular cosplay choices at conventions. Whether you’re a seasoned cosplayer or attempting your first costume, this comprehensive guide will walk you through every step of creating an authentic, stunning Frieren cosplay that captures both the character’s mystical beauty and her profound character depth.
Why Frieren Is the Perfect Cosplay Choice
Frieren’s popularity in the cosplay community stems from multiple factors that make her an ideal character to portray. Her design combines simplicity with elegance – the signature silver-white hair, pointed elf ears, and layered white outfit create an instantly recognizable silhouette that works beautifully in photographs. Beyond aesthetics, Frieren’s character arc – from a cold, ancient mage learning to value human connections – resonates deeply with audiences, making her cosplay inherently meaningful.
The character’s timeless fantasy aesthetic also means the costume remains perpetually relevant. Unlike trend-dependent designs, Frieren’s mage attire transcends seasonal popularity, allowing you to wear your costume for years at multiple conventions, photoshoots, and community events.
Understanding Frieren’s Character & Design
Before constructing your costume, understanding who Frieren is will inform every design choice. Frieren is a 1000-year-old elven mage who spent ten years on a quest with the hero Himmel and his party to defeat the Demon King. After their victory, she returns to the world only to discover that fifty years have passed – her companions have aged significantly, and Himmel dies shortly after their reunion. This profound loss triggers Frieren’s emotional journey: she realizes she never truly knew the people closest to her and embarks on a new journey to understand humanity before seeking Himmel in the afterlife.
This narrative context is crucial for cosplay authenticity. Frieren’s personality reflects her centuries of existence – she’s calm, measured, sometimes emotionally distant, yet increasingly warm as the story progresses. Her design embodies these traits: elegant and composed, never flashy, suggesting quiet strength and ancient wisdom. When wearing your Frieren cosplay, aim to capture this dignified grace – stand tall, move deliberately, and express calm confidence rather than theatrical exuberance.
Core Costume Components: Breaking Down the Layers
Frieren’s outfit consists of a carefully layered system that creates visual depth while remaining elegant. Understanding each component helps you replicate the look authentically, whether purchasing ready-made or crafting from scratch.
The Foundation: Hair & Elf Ears
Frieren’s most immediately recognizable feature is her long, silver-white hair. The color is distinctive – not platinum blonde, but true white with slight silver undertones. The texture should appear smooth and sleek, often styled straight or with a subtle wave. While some cosplayers opt for pigtails or twin-tails variations, the classic long single style best captures her character.
Wigs are your best option unless you naturally have silver-white hair. When selecting a wig, look for:
-
Heat-resistant synthetic fiber (allows light styling with flat irons)
-
Pre-styled appearance reducing DIY work
-
Appropriate length (typically 24-32 inches for proper flow)
-
Quality that withstands extended wear at conventions
The pointed elf ears are equally essential. These aren’t subtle – they’re distinctly prominent and elongated, giving Frieren her distinctly otherworldly appearance. You have three primary options:
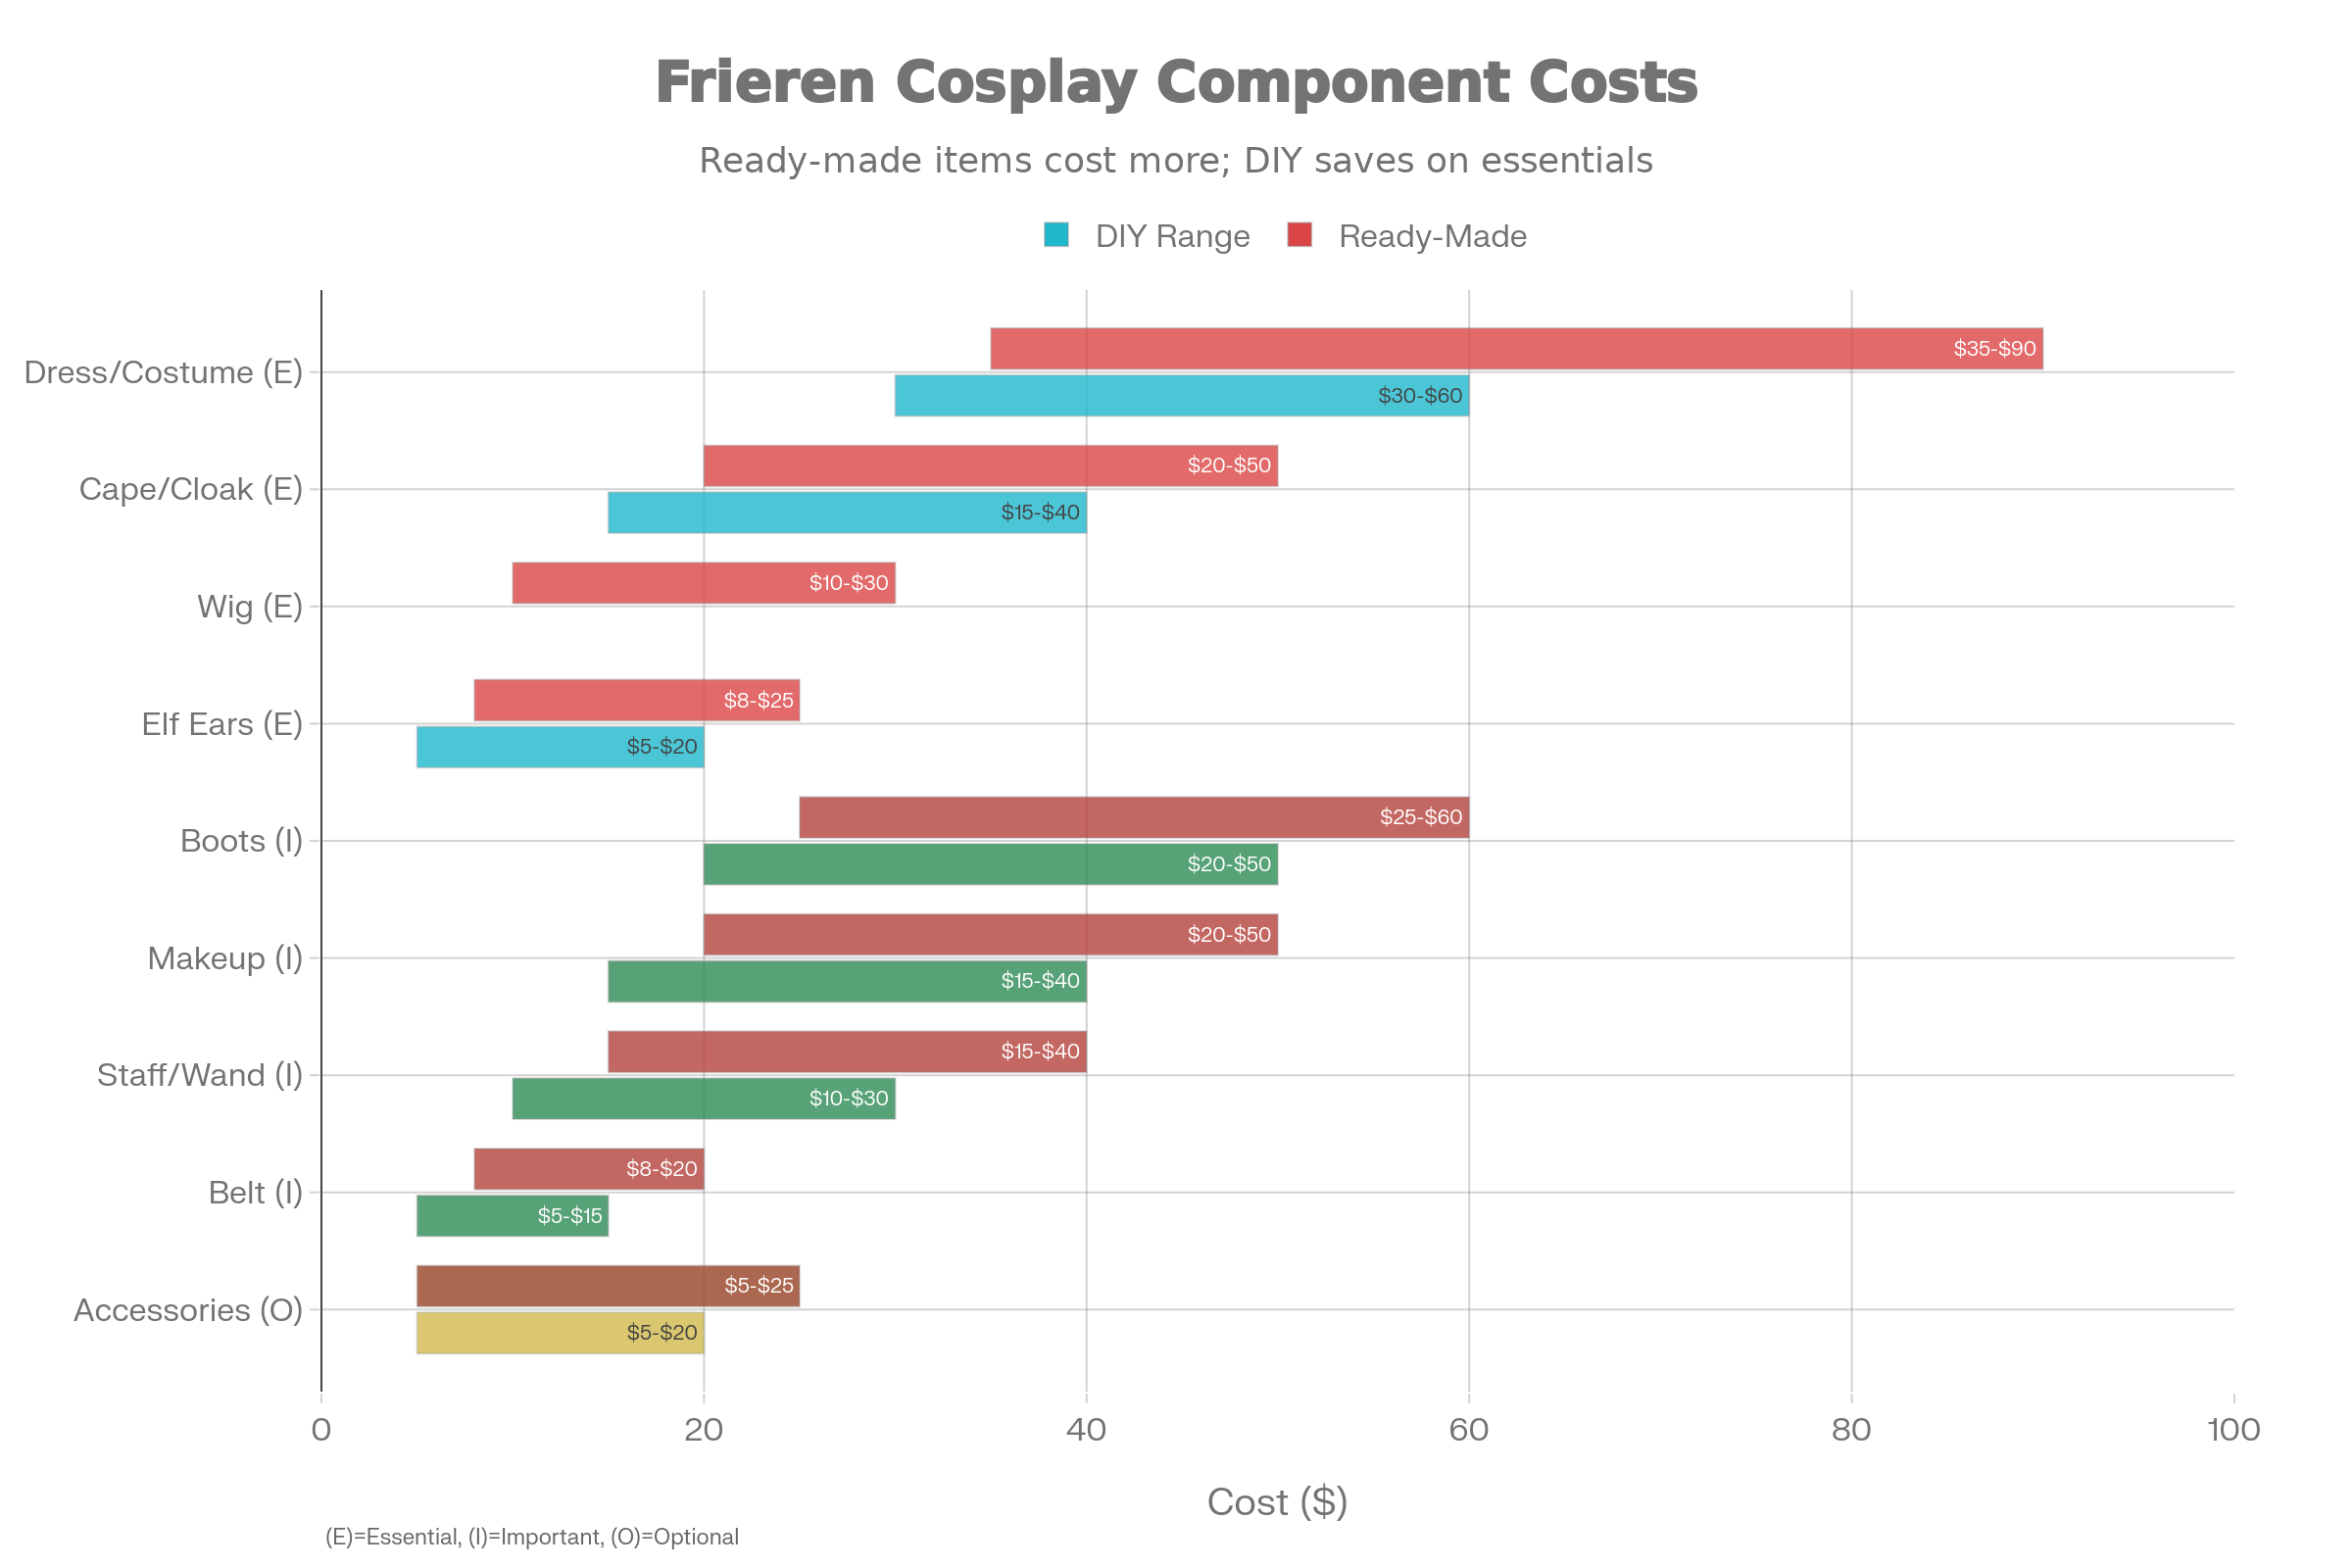
Prosthetic Option: Purchase pre-made latex or silicone ears ($8-$25). These look professional and photograph beautifully. Attach using spirit gum and liquid latex, then blend with makeup.
Handmade EVA Foam: Create from craft foam ($5-$15) using heat-molding techniques. More durable and comfortable for extended wear than fragile latex.
Clip-On Style: Prosthetics with clip attachment to your wig cap. Avoids skin irritation and allows removal without residue.
The Layered Clothing System
Frieren’s outfit achieves its distinctive silhouette through intelligent layering. Understanding this system prevents common beginner mistakes like choosing monolithic garments that don’t replicate the visual depth of the original design.
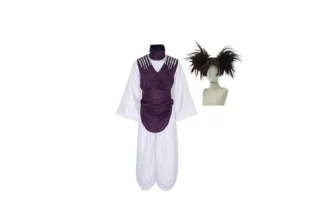
Base Layer – The Striped Shirt: Beneath everything sits a black-and-white horizontally striped shirt. This base layer is partially hidden but essential – it shows at the neckline, cuffs, and creates visual interest. The stripes are roughly equal width, creating clear contrast.
Mid-Layer – White Tunic/Jacket: The primary visible layer is a white garment (often drawn as both jacket and tunic in different scenes) with decorative gold cuff details. The sleeves are long and fitted, with distinctive gold-trimmed cuffs that extend slightly beyond the wrist. The jacket features a crisp, structured appearance.
Outer Layer – White Cape with Golden Trimmings: The most visually striking element is a white cape or cloak featuring elegant golden trim along the edges and hem. This cape flows gracefully to approximately knee-length, adding movement and visual drama. The golden trimmings aren’t thin ribbon – they’re substantial, often 1-2 inches wide, giving the costume a regal appearance befitting an ancient mage.
Skirt Element: Beneath these layers is a white skirt, typically knee-length, with a black belt cinching the waist. This creates structured silhouette while maintaining the flowing, graceful aesthetic.
Lower Garments & Accessories
Black leggings provide contrast and practicality, while knee-high brown boots ground the look with an adventurer’s pragmatism. The boots should appear well-traveled – fantasy and adventure-ready rather than pristine.
The black belt is functional yet decorative, usually featuring a simple buckle. Don’t underestimate this accessory’s importance – it defines the waistline and creates visual separation between the upper costume layers and the skirt.
Frieren’s magic staff or wand is essential for complete authenticity. Her staff features a long ornate handle with a glowing red gemstone at the top, symbolizing her powerful mage abilities. This can be crafted from foam and painted ($15-$30), 3D printed ($20-$40), or purchased pre-made ($15-$35).
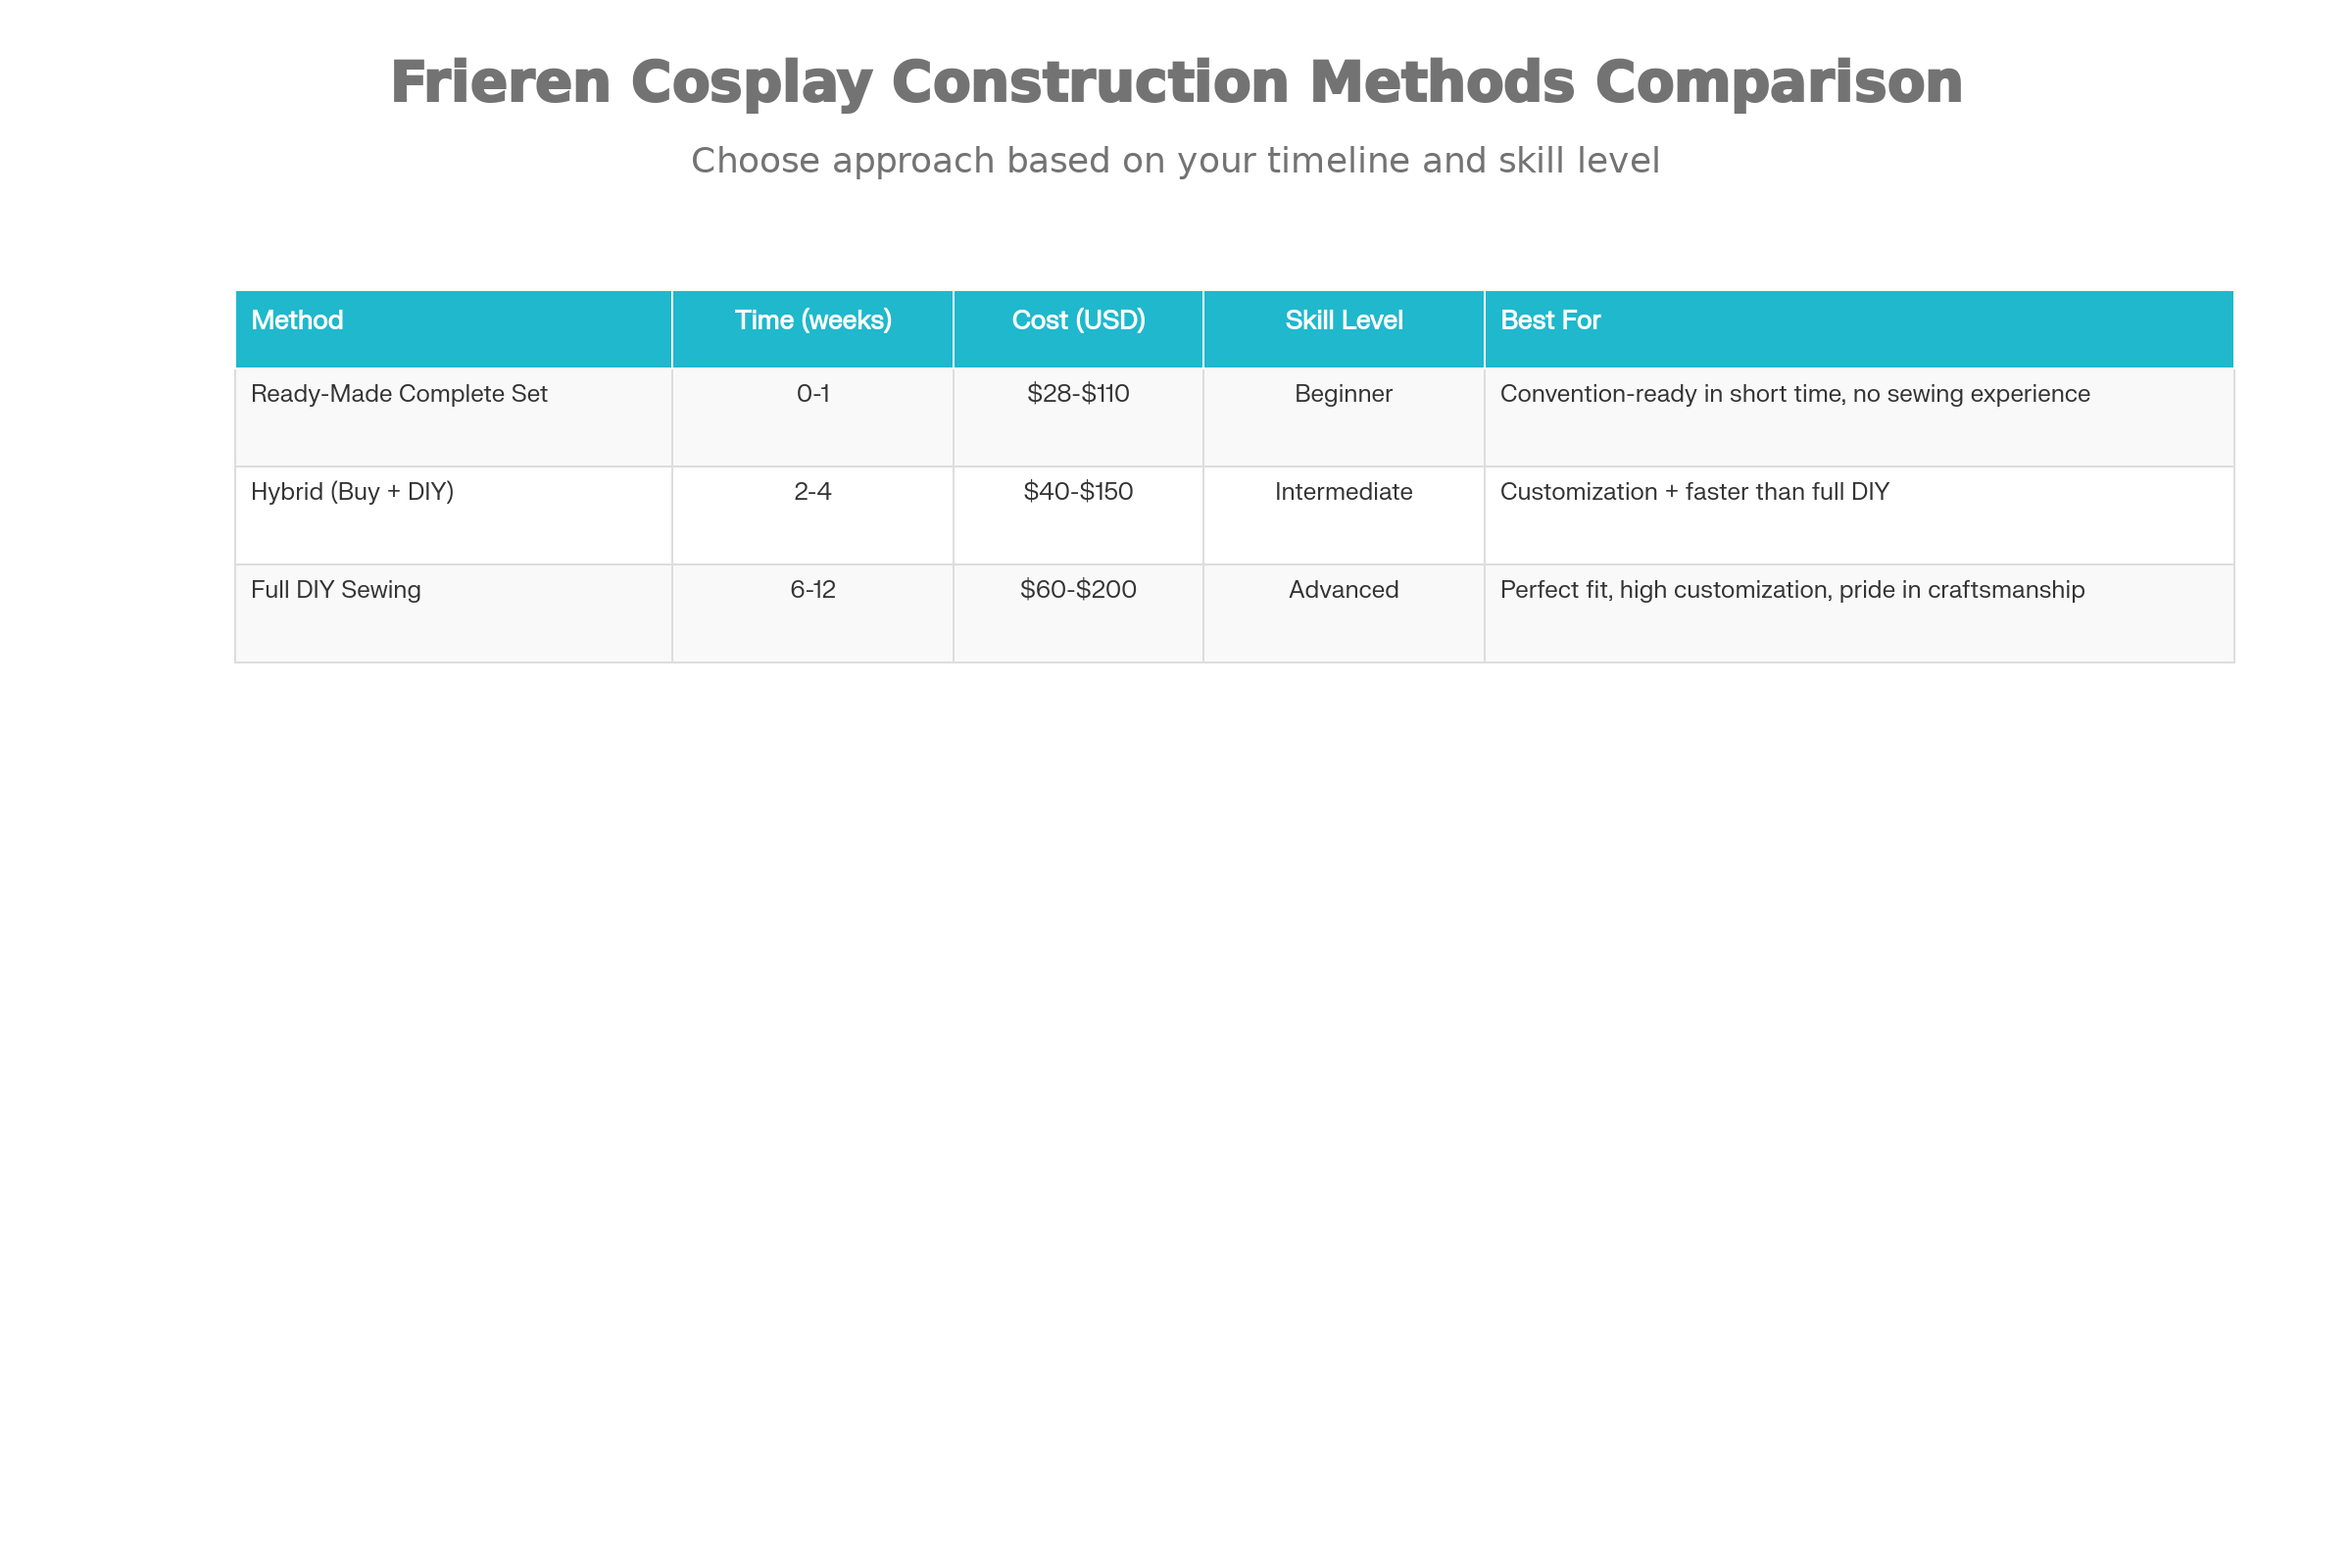
Costume Construction: Three Viable Approaches
Ready-Made Complete Sets
The fastest route to a convention-ready Frieren costume is purchasing pre-made sets. Major retailers like Amazon, EZcosplay, DHgate, Etsy, and Shopee offer complete costume packages ranging from $28-$110. These sets typically include the dress, cape, belt, wig, and sometimes elf ears.
Advantages:
-
Zero sewing experience needed
-
1-14 day delivery (depending on retailer)
-
Budget-friendly ($50-$110 for complete costume)
-
Quality is typically acceptable for convention wear
-
Multiple color and style variations available
Disadvantages:
-
Sizing might not be perfect
-
Customization limited
-
Less personal investment and pride
-
Materials may not feel premium
Best for: Beginners, those with limited time, cosplayers wanting multiple costume variations.
The Hybrid Approach
Purchasing the base costume while creating accessories and props yourself offers an excellent middle ground. This method lets you customize details while avoiding extensive sewing.
Typical allocation:
-
Buy: Complete dress/costume set ($50-$80)
-
Buy: Wig ($15-$25)
-
Make: Elf ears, magic staff, accessories ($20-$40 materials)
-
Make: Belt customization or props ($5-$15)
This approach typically costs $90-$160 total and requires 2-4 weeks. It’s ideal for builders with basic crafting skills who want reasonable customization without full sewing commitment.
Full DIY Sewing
For cosplayers with sewing experience or willingness to learn, constructing the entire costume from scratch offers maximum customization and pride of craftsmanship. This typically requires 6-12 weeks and $60-$200 in materials.
Essential skills:
-
Basic sewing (straight seams, gathering, elastic)
-
Pattern reading and modification
-
Fitting and alteration
-
Accurate cutting and measurement
Materials needed:
-
Pattern (purchased or adapted from existing patterns)
-
Fabrics: Cotton/polyester blend for main pieces ($1-$3/yard), fleece or wool blend for cape ($2-$5/yard)
-
Interfacing (light, medium, and heavy weight)
-
Trim materials (gold ribbon, satin, decorative tape)
-
Thread, notions, fasteners
-
Lining fabrics for a professional finish
The advantage of DIY construction is achieving perfect fit, selecting premium fabrics, and creating details precisely matching character artwork. Disadvantages include time investment, skill development requirements, and potential for costly mistakes.
Creating Professional-Quality Wig Styling
Your wig appearance can make or break your cosplay. A flat, poorly-styled wig – even on an otherwise excellent costume – reads as unfinished. Fortunately, creating Frieren’s signature look doesn’t require cutting or gluing your wig.
Preparation & Materials
Gather these supplies before styling:
-
Hair spray (strong hold)
-
Hair wax or gel (for shaping)
-
Comb (preferably with a rat tail end)
-
Crimper (optional but recommended)
-
Hair clips
-
Wig cap
-
T-pins for wig cap security
Step-by-Step Styling Process
Section the Front: Divide the front portion of the wig into three sections – a center part down the middle and two side sections. This creates Frieren’s characteristic face-framing style.
Create Volume: Tease sections that will show in front-facing photos. Use the comb’s backside to backcomb gently, creating fullness. This prevents a bald appearance in photographs. Secure with hair spray while holding the section upward.
Center Part & Wax: Use hair wax along the center part to hold the shape throughout the day. The middle section should appear smooth and intentional, not accidental.
Crown Crimping: Crimp the top crown area where the wig cap’s sewing pattern is visible. This adds volume and texture to photos. Tease and spray multiple times for secure hold. If you lack a crimper, teasing repeatedly and applying spray creates similar texture.
Secure with Pins: Use T-pins to anchor the side sections, especially if styling pigtails. Pin through the wig into the wig cap – never directly to your scalp.
Pigtail Method (Pain-Free): Many cosplayers make the mistake of clipping pigtails directly to their wig cap or hair, causing scalp pain. Instead, braid a small section of the wig hair itself, then clip the pigtail extensions into the braid. This distributes weight and eliminates pain.
Final Spray: Apply setting spray liberally to ensure your styling survives convention crowds and photography sessions.
Makeup & Prosthetic Application
Professional makeup and properly applied prosthetics elevate your cosplay from good to outstanding. This section covers techniques used by experienced cosplayers.
Elf Ear Attachment & Blending
Application Process:
-
Trim any stray hair around your ears and clean the skin thoroughly
-
Fit the prosthetic ear in place, checking size and positioning
-
Apply spirit gum (structural adhesive) where the prosthetic contacts your ear
-
Hold in place for 30-60 seconds while adhesive sets
-
Apply liquid latex around the edge where prosthetic meets skin
-
Brush from skin toward the ear tip to fill gaps naturally
-
Allow latex to dry completely (turns translucent pinkish when ready)
-
Apply additional latex layer if needed, allowing drying between coats
-
Apply latex-compatible makeup (Ben Nye grease paint recommended) to match your skin tone
-
Blend edges seamlessly with surrounding skin
Critical Detail: Never use regular makeup on latex prosthetics – it breaks down the latex and won’t adhere properly. Always use professional theatrical makeup or latex-compatible products.
Finishing Touches:
-
Apply base coat of makeup to the entire ear
-
Add contour shadows for definition
-
Highlight edges with white cream to make ears “pop” in photographs
-
Add subtle pink blush to ear tips for natural appearance
-
Use setting spray to secure makeup throughout the day
Face Makeup for Character Authenticity
Frieren’s makeup should be subtle and ethereal, reflecting her ancient wisdom and calm personality.
Foundation & Base: Use foundation matching your skin tone precisely. Frieren’s look works best with a natural, flawless base rather than dramatic color choices.
Eye Makeup: Keep eye makeup minimal and elegant. Neutral or subtle cool tones work best. Consider slight eye-opening makeup (a thin eyeliner and subtle shadow) that suggests her calm, observant nature.
Lip Color: Choose a neutral or cool-toned shade that doesn’t compete with the overall look. Frieren’s makeup should never look dramatic or flashy.
Setting & Longevity: Use setting spray and powder to ensure your makeup survives the entire convention. Plan for touch-ups if wearing the costume for 8+ hours.
Where to Shop: Retailer Comparison & Strategy
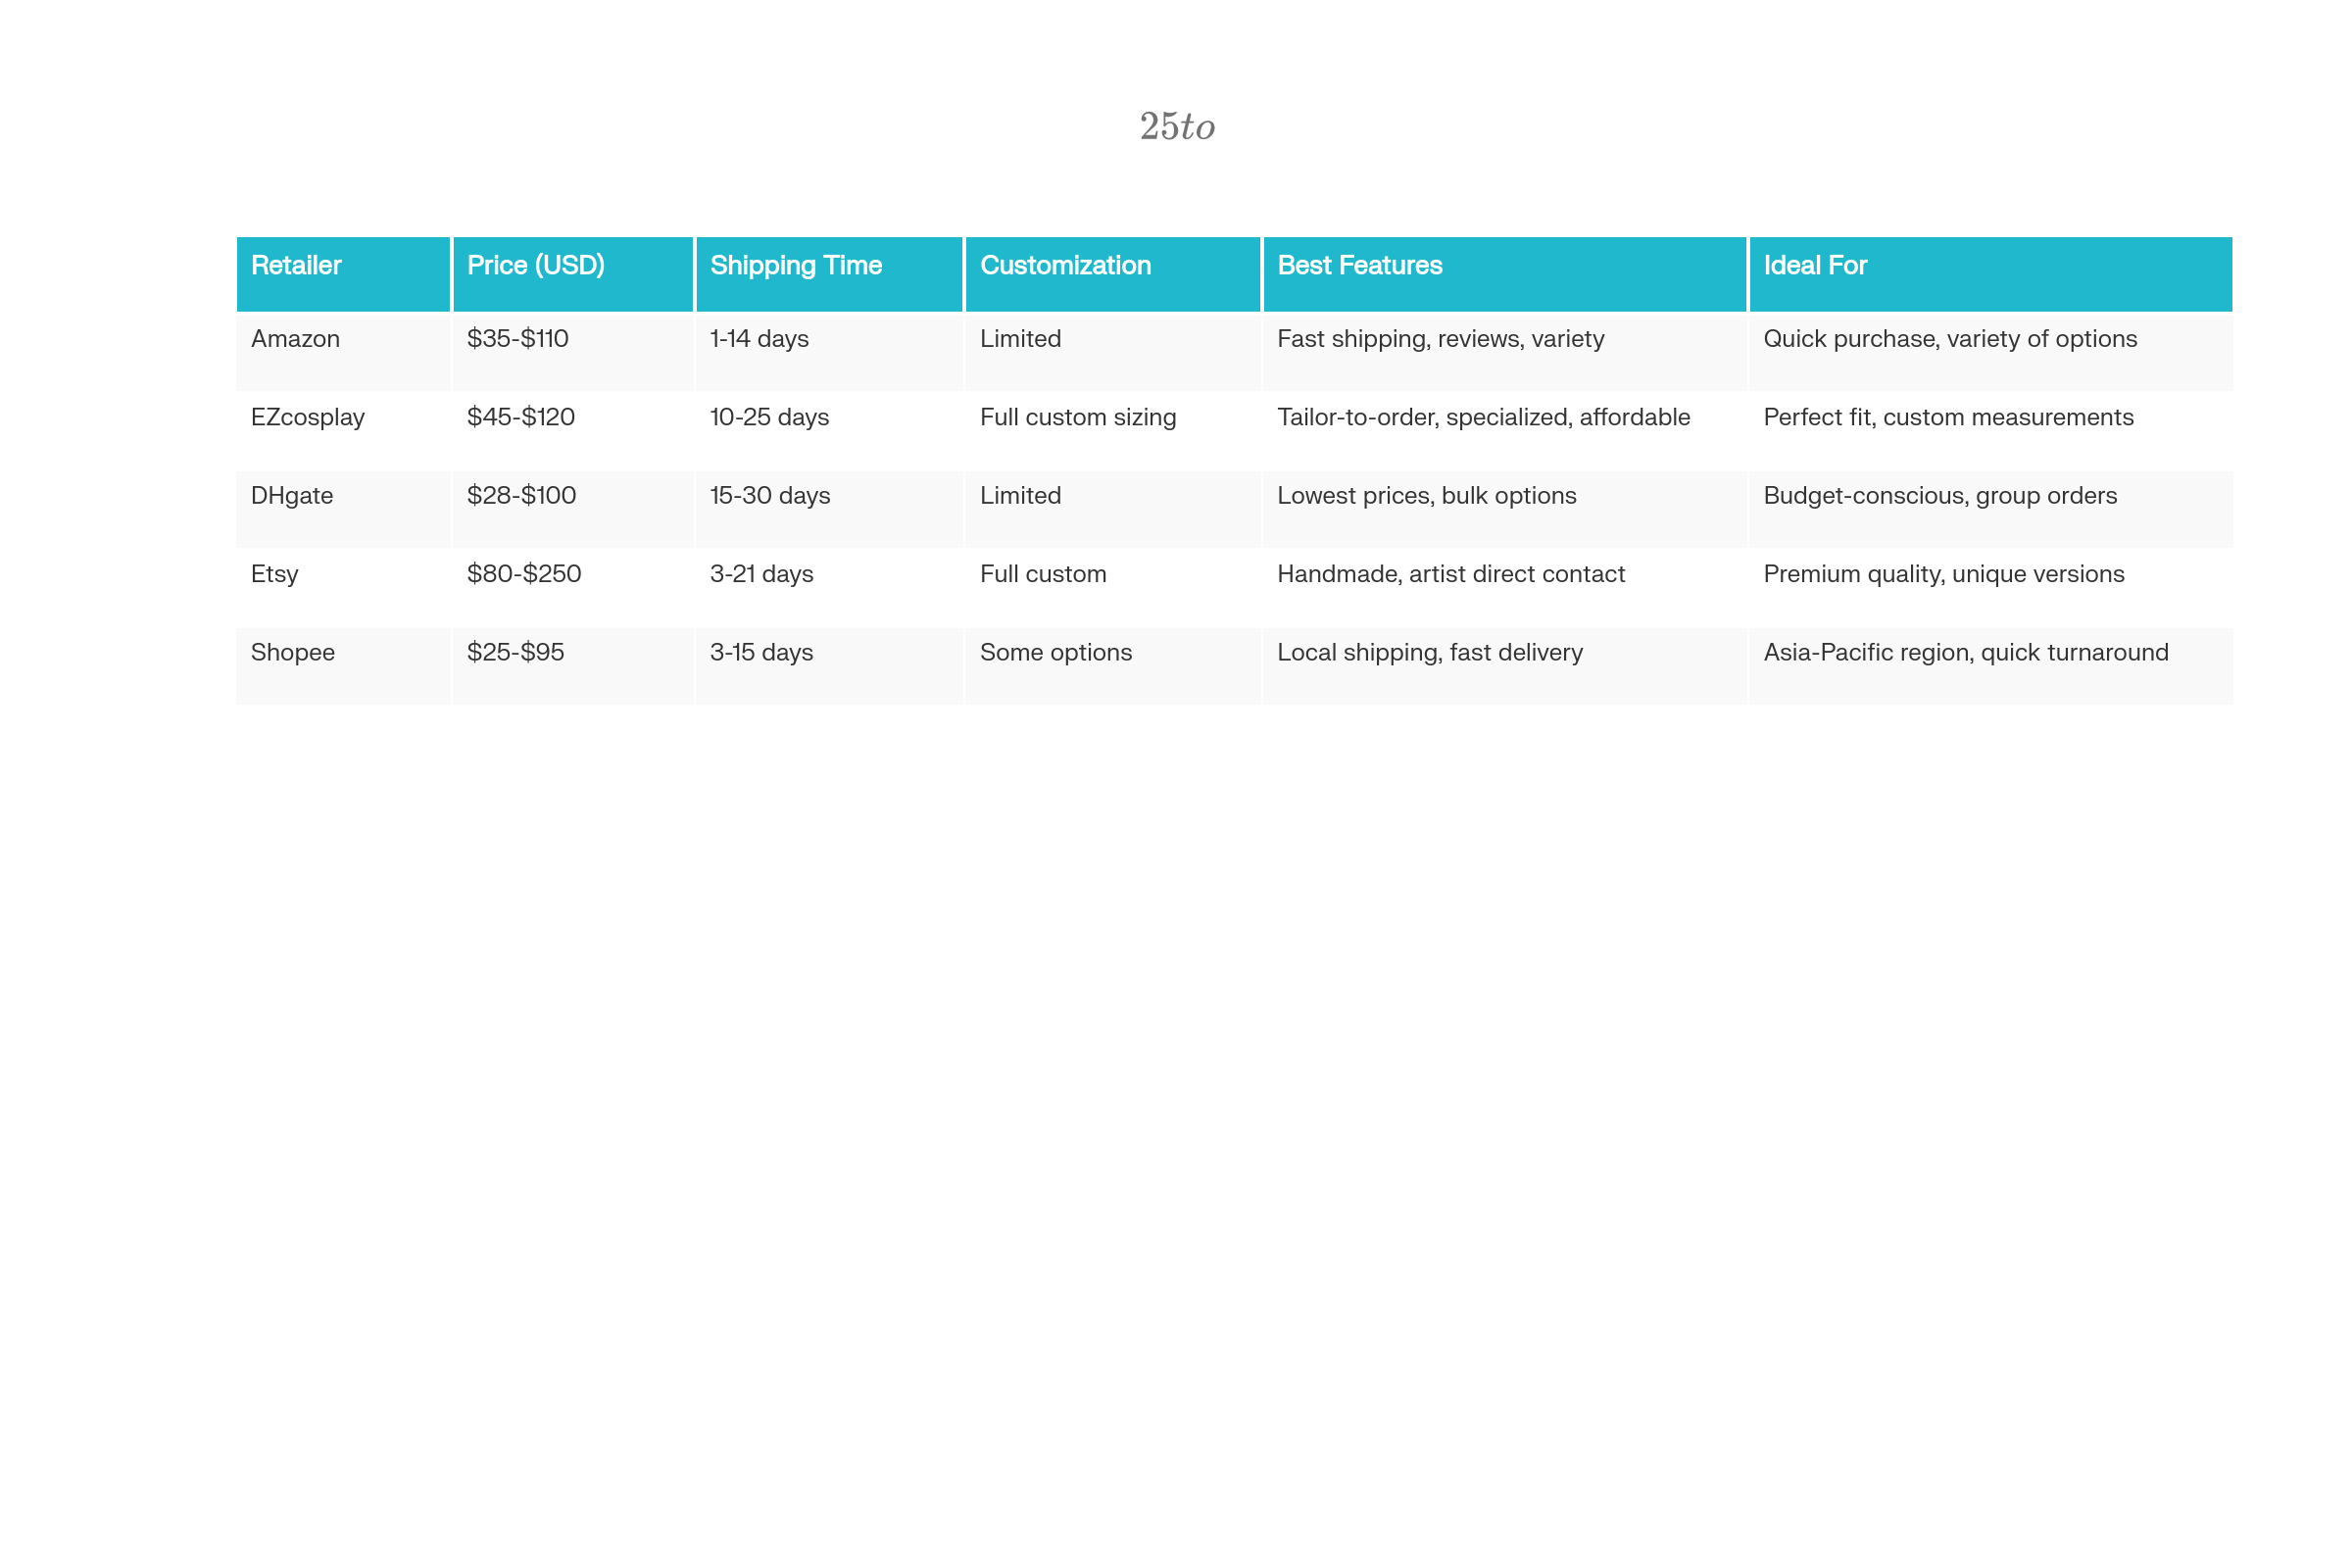
Amazon: Speed & Variety
Amazon excels for rapid costume acquisition, offering numerous sellers with competitive pricing ($35-$110) and shipping within 1-14 days. Customer reviews provide quality insight, and return policies offer security.
When shopping Amazon, filter by:
-
Seller feedback (4.5+ stars minimum)
-
Customer review photos (verify actual product quality)
-
Shipping speed (“Prime” for fastest delivery)
-
Return window (30+ days protection)
EZcosplay: Customization & Tailor-to-Order
EZcosplay specializes in cosplay costumes with tailor-to-order options ($45-$120). This retailer accepts custom measurements, ensuring proper fit. Processing time runs 7-35 days depending on complexity, but the finished costume is tailored specifically to your dimensions.
Best for: Those with unusual sizing, requiring perfect fit, or wanting specific customizations like altered sleeve length or added pockets.
DHgate: Budget Option with Trade-offs
DHgate offers the lowest prices ($28-$100) but requires patience – expect 15-30 day shipping to North America or Europe. Customization is limited, and communication with sellers can be challenging.
Best for: Budget-conscious cosplayers with advance planning, group costume orders, or those willing to modify ready-made pieces.
Etsy: Artisan Quality & Custom Work
Etsy connects you directly with cosplay makers offering handmade costumes ($80-$250+). Prices are higher, but quality is often premium, and makers will discuss customizations directly.
Advantages: Direct artist communication, custom color changes, premium fabric upgrades, support for small creators, unique variations not available elsewhere.
Best for: Those valuing premium craftsmanship, wanting unique customizations, or supporting independent artists.
Shopee: Regional Fast Shipping
For Asia-Pacific based cosplayers, Shopee offers local shipping (3-15 days) with competitive pricing ($25-$95). Multiple sellers provide options and price competition.
Best for: Cosplayers in Asia-Pacific region, needing quick turnaround, preferring local customer service.
Comfort & Practicality at Conventions
An uncomfortable costume ruins the convention experience. Professional cosplayers prioritize comfort alongside appearance.
Sizing & Fit Strategy
When ordering, provide accurate measurements:
-
Chest (across fullest part)
-
Waist (natural waistline)
-
Hip (fullest part)
-
Shoulder width
-
Arm length (shoulder to wrist)
-
Inseam (hip to ankle)
-
Total height
Sizing Tip: Choose one size up from your normal clothing size. Frieren’s layered design requires room for multiple garment layers, and loose fit suits the character’s flowing aesthetic better than tight clothing.
Ordering Timeline: Order 4-6 weeks before the convention. This allows time for shipping, fitting adjustments, and alterations if needed.
Alteration & Adjustment
Professional tailors can adjust ready-made costumes ($15-$40 per alteration). Common adjustments:
-
Hemming (sleeves, dress length)
-
Taking in/letting out seams (fit adjustments)
-
Adjusting cape length
-
Tightening loose arms or torso
Budget $30-$60 for potential alterations and factor this into your total cost.
Boot & Footwear Strategy
Comfortable boots are essential – convention halls require hours of walking. Break in your boots minimum 2-3 weeks before the convention. If they still feel uncomfortable, invest in gel inserts or cushioning. Many cosplayers carry backup shoes for rest periods.
Managing Convention Wear
-
Wear moisture-wicking base layers beneath your costume
-
Choose undergarments that don’t show under white/light fabrics
-
Carry a small repair kit: safety pins, thread, needle, fabric tape
-
Bring a mirror for touch-ups
-
Pack extra wig caps and bobby pins
-
Carry makeup for touch-ups (especially for elf ear blending)
Photography & Community Engagement
Location Selection
Choose photoshoot locations that complement Frieren’s ethereal aesthetic:
-
Outdoor settings with natural light
-
Gardens or parks with fantasy-appropriate backgrounds
-
Stone or architectural elements suggesting ancient magic
-
Times when sunlight creates gentle shadows
-
Avoid harsh midday sun – shoot in early morning or late afternoon
Posing Techniques
Frieren’s dignified personality informs her posing. Avoid exuberant, overly animated poses. Instead:
-
Stand tall with confident posture
-
Hold the staff with quiet authority
-
Gaze thoughtfully into distance
-
Maintain calm facial expression
-
Use flowing cape movement in dynamic shots
-
Position elf ears prominently with side-angle shots
Hashtag Strategy & Community Engagement
Build your cosplay presence using targeted hashtags:
-
#FrierenCosplay #FrierenBeyondJourneysEnd
-
#CosplayPhotography #AnimeConvention
-
#ElfCosplay #MageCosplay
-
#CosplayTutorial #CosplayConstruction
Share behind-the-scenes content:
-
Costume construction process photos
-
Makeup application timelapses
-
Wig styling tutorials
-
Convention experience moments
-
Collaboration photos with other cosplayers
Engage with the Frieren community by following other cosplayers, commenting supportively on their work, and sharing tutorials that help others develop their own costumes.
Timeline & Planning Guide
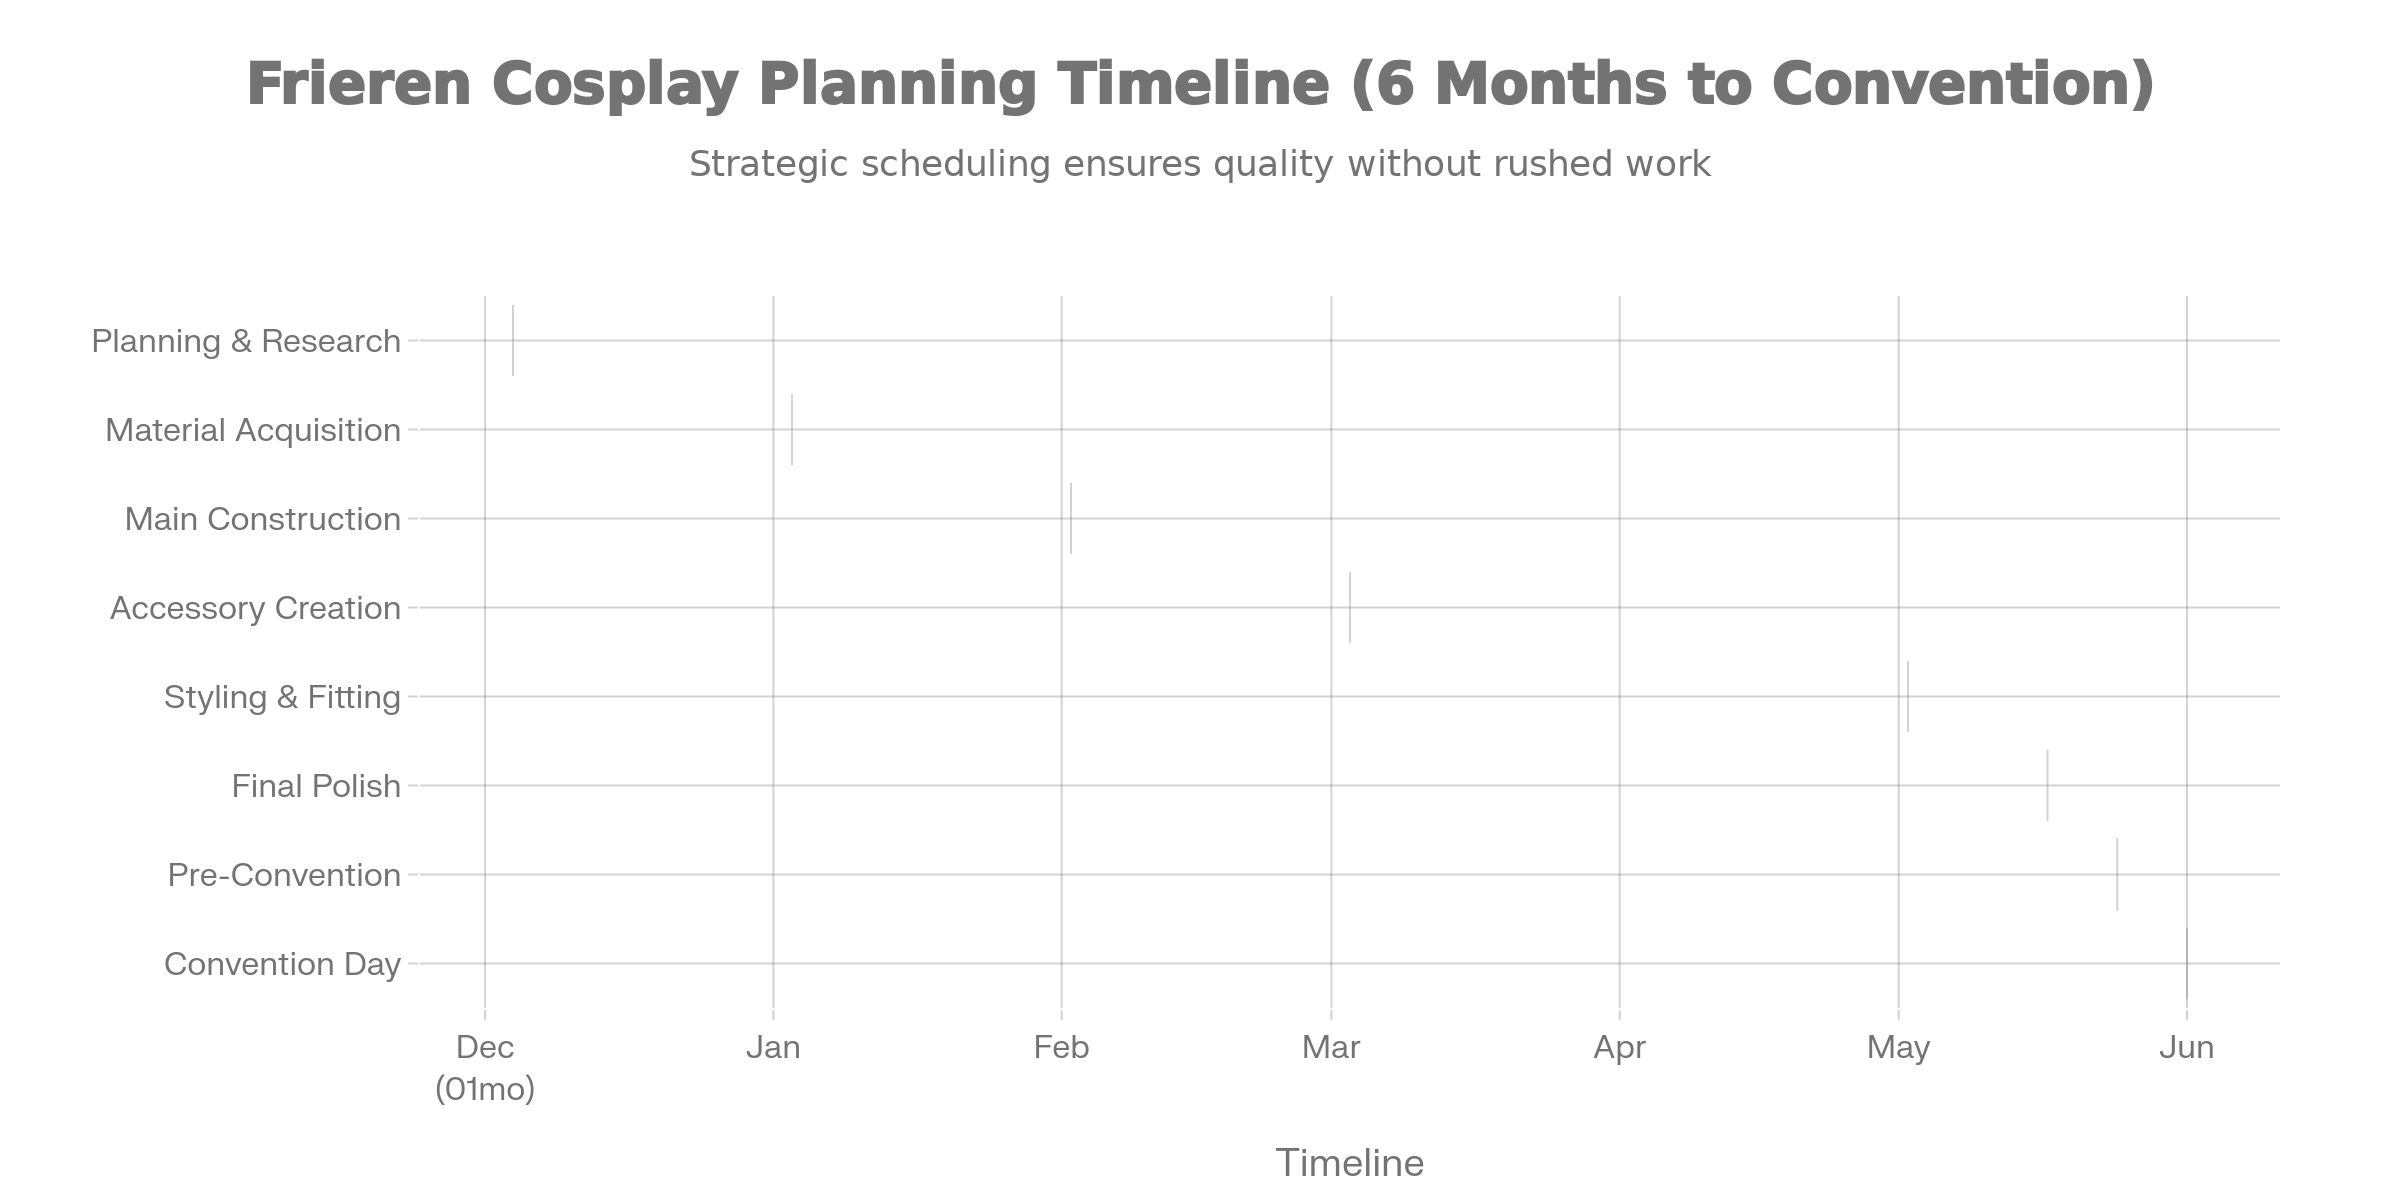
6 Months Before Convention
Research & Planning (Weeks 1-2):
-
Finalize character choice and specific costume version
-
Research design details extensively
-
Assess your skill level and available time
-
Determine budget and construction approach
-
Sketch design concepts
Material Sourcing (Weeks 3-8):
-
Purchase patterns (if planning DIY)
-
Order fabrics with samples to verify colors
-
Reserve wig orders (high-demand items ship slower)
-
Source elf ear prosthetics
-
Locate magic staff references and materials
3 Months Before Convention
Major Construction (Weeks 9-12):
-
Begin main sewing project (if DIY)
-
Complete dress/tunic construction
-
Construct cape and attach trimmings
-
Begin fitting and adjustment process
-
Create accessories (belt, props)
6 Weeks Before Convention
Accessory Phase (Weeks 13-16):
-
Paint magic staff and finish props
-
Create or finalize elf ears
-
Craft jewelry and additional accessories
-
Complete all sewing projects
-
Begin first full costume fitting
4 Weeks Before Convention
Styling & Makeup Phase (Weeks 17-20):
-
Receive wig and begin styling practice
-
Practice elf ear attachment and makeup application
-
Do complete makeup trial runs
-
Attend first full costume wearing for comfort testing
-
Identify needed adjustments
1-2 Weeks Before Convention
Final Preparation (Weeks 21-24):
-
Complete all alterations
-
Final wig styling
-
Makeup application practice (multiple sessions)
-
Full dress rehearsal in complete costume
-
Pack costume carefully
-
Prepare convention day supplies (touch-up kit, backup supplies)
Convention Day
Execute your plan with confidence. You’ve spent weeks preparing – trust your work, enjoy the experience, and engage authentically with the community.
Common Mistakes to Avoid
Learning from others’ experiences accelerates your own success. These common pitfalls are entirely avoidable with proper planning:
Fit Problems: Order too-small sizes or fail to account for layering. Result: Uncomfortable costume that restricts movement. Prevention: Choose one size up, verify measurements carefully.
Color Inaccuracy: Using wrong shade of white or gold. The white should be pure white or off-white, never cream. Gold should be warm metallic, not orange or yellow. Prevention: Order color samples and compare to reference images.
Poor Wig Appearance: Failing to style wig properly or maintaining it poorly. A flat, lifeless wig undermines otherwise excellent costumes. Prevention: Practice styling multiple times, use quality hair products, research styling techniques.
Uncomfortable Prosthetics: Attaching elf ears incorrectly or using cheap materials that hurt. Prevention: Test attachment methods, invest in quality prosthetics, follow application guides carefully.
Missing Accessories: Overlooking details like the golden trim on sleeves or cuffs. Prevention: Study official artwork carefully, compare reference images constantly during construction.
Rushed Timeline: Starting too late, leading to compromised finishing and stress. Prevention: Begin 6-12 weeks ahead based on your chosen construction method.
Uncomfortable Footwear: Wearing impractical boots that cause pain after 2-3 hours. Convention days involve extensive walking. Prevention: Break in boots thoroughly, invest in gel inserts, carry backup shoes.
Expanding Your Cosplay: Group Costume Coordination
Frieren cosplay becomes even more impactful when coordinated with group costumes featuring other party members. The original demon-slaying party includes:
Himmel (The Hero): Blonde wig, hero’s outfit with sword prop. Himmel is warm and charismatic – embody these traits in posing and interaction.
Fern (Human Apprentice): White dress with black coat, purple wig, staff prop. Fern is younger and more energetic than Frieren, though she’s learning from her mentor.
Stark (Dwarf Warrior): Red/brown outfit, solid build, weapon props. Stark is strong and straightforward, providing contrast to Frieren’s calm wisdom.
Heiter (Priest): Black robes, clerical accessories. Heiter is kind and gentle, often playing the group’s emotional anchor.
Group cosplays create stronger visual impact, generate more convention engagement, and provide photo opportunities impossible solo. Coordinate sizing, materials, and final appearance through multiple fittings and communication.
Maintenance & Longevity
A well-made Frieren cosplay should last for years, worn at multiple conventions and photoshoots.
Costume Care:
-
Hand wash fabric components in cool water with mild detergent after each wear
-
Hang to dry (never machine dry)
-
Store in acid-free tissue paper, away from direct sunlight
-
Check for damage after each use; repair immediately to prevent deterioration
Wig Maintenance:
-
Store on wig stand or in storage box between wears
-
Gently brush with wig brush (never regular hair brush)
-
Avoid heat styling except with heat-resistant fibers
-
Wash occasionally with wig shampoo if worn frequently
Prosthetics & Props:
-
Clean elf ears with mild soap after each use
-
Store away from heat and direct sunlight
-
Inspect for damage and repair latex cracks immediately
-
Paint touch-ups as needed
With proper care, your Frieren cosplay remains convention-ready for 3+ years, allowing multiple wearings and costume refinements.
Conclusion: Your Frieren Cosplay Journey
Creating a Frieren cosplay is simultaneously challenging and deeply rewarding. Whether you purchase a ready-made costume or spend months crafting every component, you’re participating in a global community of fans expressing love for this remarkable character.
Frieren’s journey – learning to value human connections despite her centuries of existence – mirrors the cosplay experience itself. Through researching, planning, creating, and wearing your costume, you develop deeper appreciation for character details, craftsmanship, and community. You’ve become part of Frieren’s story.
The path ahead is clear: decide your construction approach, set your timeline, gather materials, and execute your plan with patience and attention to detail. Whether this is your first cosplay or your fiftieth, Frieren deserves – and your effort will achieve – an authentic, stunning representation that honors both the character and the artistry of cosplay.
Your Frieren awaits. The journey begins now.
Visual References (Charts):
-
Construction method comparison
-
Retailer comparison guide
-
Cost breakdown by component
-
6-month planning timeline